
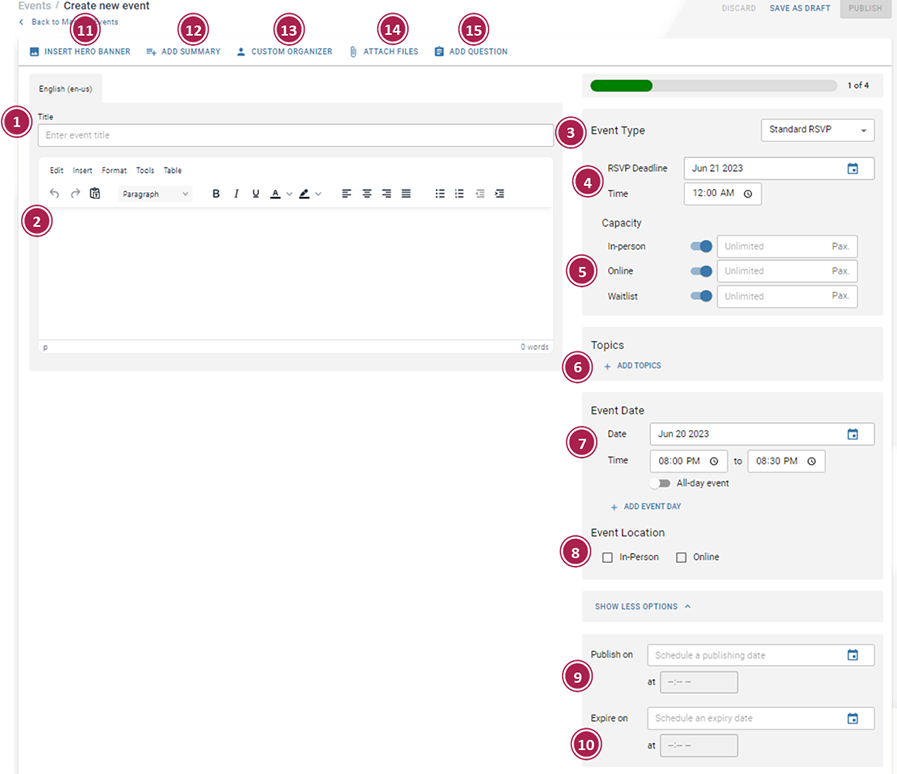
- Title (Required Field) –A key element that identifies your event and is visible to users. Keep it concise and within 50 characters for optimal visibility on different layouts.
- Body Text (Required Field) – The main content area where you provide details and information about your event.
- Event Type – Defines the purpose of the event. Allows you to select between an Informational Event and events that requires RSVP responses. By default, events are created as Informational Events, but organizers have the flexibility to choose the appropriate type that aligns with their event's purpose and RSVP needs.
- Informational: This type is primarily intended for raising awareness or providing information. It does not require RSVPs or attendance, making it suitable for occasions such as holidays or work anniversaries.
- Standard RSVP: With this type, attendees are expected to RSVP if they plan to attend the event. It helps organizers track the number of attendees and plan accordingly.
- Mandatory RSVP: In this case, attendees are required to RSVP, even if they are unable to attend. Mandatory events are pinned until users respond.
- RSVP Deadline (Required Field) – This indicates the specific date and time of when the RSVP list for the event will no longer accept responses. The RSVP Deadline is applicable when selecting Standard or Mandatory RSVP event types.
- Capacity - This refers to the maximum number of participants allowed at each event location, as well as the number of individuals that can be added to the waitlist. If you do not modify these fields, the capacity will be automatically set as unlimited. If you are not providing a specific location or waitlist, it is important to disable the capacity option to ensure it cannot be selected or mistakenly applied. The Capacity is applicable when selecting Standard or Mandatory RSVP event types.
- Topics (Required Field) – Essential content categories that every event must have. You can choose one or more topics to associate with your event.
- Event Date – This indicates the specific date and time of the event. It provides the flexibility to include multiple dates if the event spans across multiple days.
- Event Location – This refers to the physical or virtual space where the event will take place. You have the option to choose between an in-person, online, or hybrid format, depending on your specific requirements.
- In-Person: This option is chosen when your event is scheduled to occur at a specific physical location. By selecting this option, you can enter the address or venue details, which will be provided to participants.
- Online: This option is chosen when your event is scheduled to occur in a virtual environment. By selecting this option, you can enter the required online details, such as the virtual location and URL.
- Publish On – This indicates the specific date on which the event is intended to be published. You have the option to either publish the event immediately or schedule it for a future date.
- Expiry On – This indicates the specific date on which the event is set to expire or be automatically unpublished. By setting an expiry date, you establish a point in time when the event information will no longer be visible or accessible to participants.
- Insert Hero Banner – The primary image representing your event and appears on the event feeds. You can select one or more images from the media gallery or upload your own image(s).
- Add Summary – Provides an optional brief description of the event. To maintain a balanced and uniform layout, it is recommended to keep the summaries limited to 2-3 sentences. If no summary is provided, the first sentence of the event body will be utilized in the event feeds.
- Custom Organizer – Allows you to designate another user as the organizer of the event by selecting their name and email.
- Attach Files – Easily include related documents directly with your event. You can attach existing documents or upload your own files.
- Add Questions – Enables you to include up to three questions for participants to answer when they RSVP for an event. When users respond to the event invitation, they will be prompted to provide their answers. The answers can be accessed and managed in the Manage Participants section. The Add Questions is applicable when selecting Standard or Mandatory RSVP event types.