
What is a sender name and email?
You can configure one or more emails to be used on the ‘From’ field for your newsletters. Assigning the right Sender Email to the right newsletter helps your audiences trust the emails that they receive. Here's a example of how these details appear on their inboxes:

- Sender name. This is the "From" name that appears in the inboxes of the recipients.
- Sender email. This is the return address shown on the emails being received. You can only change the prefix of sender emails. Please contact our support team to change the default domain in the sender details.
You can add or delete newsletter sender emails in Newsletter Global Settings.
Only Owners/Admins can access this feature.
Adding sender names and emails
- Go to admin.sparrowconnected.com
- Choose your account type (Microsoft Work Account, Google, LinkedIn, Facebook, Apple, Microsoft Personal Account or ADFs)
- Login using your credentials. You'll be redirected to your Intranet Lite Homepage.
- Click on the wrench icon, or expand the menu (located on the left side of your screen) and click on "Go to Admin Portal"
- Access Newsletters directly from the dashboard, or go to Messaging Center > Newsletters on the left navigation pane
- Go to More Options > Newsletter Global Settings
- In the Sender emails section, enter the sender name and prefix.
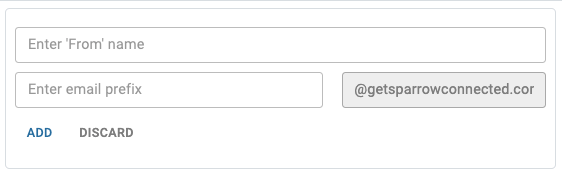
- Click on 'Add' and save your changes.
Deleting sender names and emails
- Repeat step 1 to 6 in Adding sender names and emails.
- Under the Newsletter Global Settings
- In the Sender emails section, you'll see the list of sender emails your organization has saved.
- Search for the sender email you want to delete and click on 'X' icon.
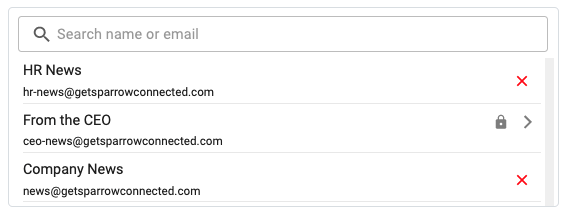
- Confirm your action.
⚠️ You cannot delete sender emails which use the lock icon. This indicates that the sender email is currently assigned to a newsletter and in use. Click on the lock icon to see the list of all newsletters that use this sender email.
Assigning a sender name and email to a newsletter
- Repeat step 1 to 6 in Adding sender names and emails.
- Select on the newsletter you want to assign the sender email to, or create a new newsletter.
- In the Settings tab, you'll see the 'Send details' section. Click on 'Select email' or 'Change email'.
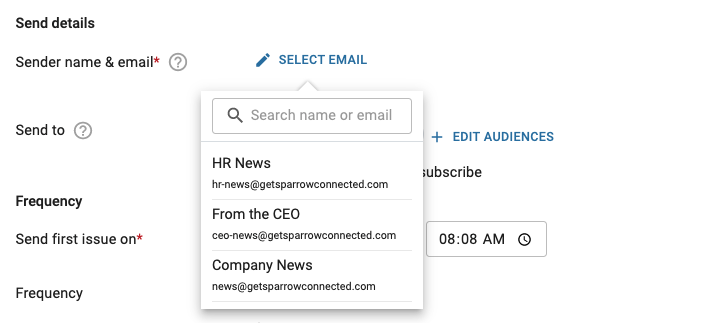
- Search for and select the sender email you want to assign to your newsletter.
- Publish your newsletter to save the changes.